


HangNailz™ Framer's Kit for Wood and Composite Frames
Shipping calculated at checkout
In stock
The HangNailz™ Framer's Kit is a two-part solution designed for professional framers and artists who pre-install hardware on 2D & 3D artwork, sculpture, and/or picture frames for drywall-mounted applications on behalf of their clients and customers. The kit is designed to provide a fast and easy alternative to labor intensive installations such as eyebolts and framing wire, d-rings, and keyholes. With this framing kit, you simply mount the sleeve, then attach the second portion of the kit to be installed by the consumer. Takes less seconds compared to the time involved in wire hardware prep. It's easy for the framing professional to install, and super simple for their customers' use!
Benefits for Your Business
- Enhanced Workflow Efficiency: The simplified, consistent installation process improves workflow and reduces the chance for installation errors, making your framing jobs smoother and more predictable.
- Reduced Liability: The easy, foolproof installation for customers lowers the risk of improper hanging, reducing the chance of callbacks or complaints about wall damage or fallen artwork.
- Eco-Friendly and Reusable: Durable design and easy removability mean customers can reuse the hardware, aligning with the sustainable practices many customers value
- Time-Saving Installation: The quick mount-and-go setup dramatically reduces installation time compared to traditional hardware like eyebolts, framing wire, D-rings, and keyholes, allowing you to complete more projects in less time.
- Enhanced Customer Convenience & Satisfaction: The two-part system makes it easy for clients to securely mount their artwork at home with minimal effort, adding value and a positive experience to your service.
- Professional Results: Eliminates the need for visible wires or extra hardware, resulting in clean, streamlined hanging that appeals to clients seeking a polished look.
- Differentiates Your Business: By offering our innovative, client-friendly mounting solution, you position your services as modern and thoughtful, setting you apart in a competitive market.
- Adjustable Shim: With the included shim, you can easily adjust the frame once it's on the wall.
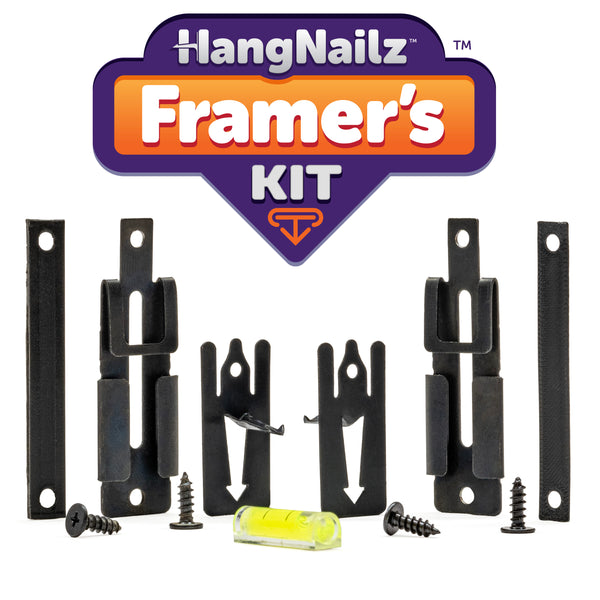
What's Included in the Kit
- 2 Framer's Kit Sleeves
- 2 Stick'ums
- 8 M4, 12 mm screws
- Instructions for Framers and Consumers
- Level
Product Specifications
Material: 24-gauge steel (tempered)
Color: Black (from tempering process)
Weight Capacity: 35 lbs per Anchored Sleeve
—
Framer's Kit Sleeve (Single) Width: .875 in / 22.25 mm
Framer's Kit Sleeve (Single) Height: 2.75 in / 70 mm
Framer's Kit Sleeve (Single) Depth: .0625 in / 1.6 mm
Framer's Kit Sleeve (Single) Weight: .25 oz / 7.1 g
—
Stick’ums (Single) Width: .75 in / 19mm
Stick’ums (Single) Height: 1.625 in / 44 mm
Stick’ums (Single) Depth: .75 in / 19 mm
Stick’ums (Single) Weight: .12 oz / 3.4 g
—
M4 Screw (single) Head Width: .325 in / 8 mm
M4 Screw (single) Shaft Width: .165 in / 4 mm
M4 Screw (single) Shaft Length: .475 / 12 mm
M4 Screw (single) Weight: .04 oz / .9 g
—
Level Width: 1 in / 26 mm
Level Height: .32 in / 8 mm
Level Depth: .32 in / 8 mm
Level Weight: .05 oz / 1.4 g
Package Specifications
Framer's Kit Package Width: 3.25 in / 82.5 mm
Framer's Kit Package Height: 6.875 in / 175 mm
Framer's Kit Package Depth: 1 in / 25.5 mm
Framer's Kit Package Weight: 1.7 oz / 48.25 g
Installation Guide (PDF)
Instructions for Framers
Instructions for Consumers
Patented Features
An Innovative Sleeve for Professional Results
A tough, reliable big brother to Stick'ums, this kit is built for
strength, convenience, and the demands of professionally framed decor. Unlike light wall hangings, professionally framed art often includes real glass, heavier frames, and denser materials that require serious holding power. That’s where the Framer’s Kit comes in. Simply mount the sleeve, and the final portion of installation is ready to be finished in your customers' homes with minimal effort.
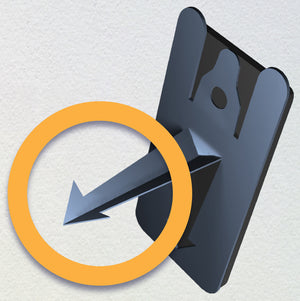
Proprietary V·Barb Design
The proprietary V·Barb design ensures a secure, tool-free hold—just push it in where you need it, with no measuring or guesswork. The unique barb locks into place, providing a stable hold without slipping, so anyone can hang items confidently in seconds. This reliable, easy-to-use design lets you set up displays exactly as you envision, and it’s equally easy to remove or reposition without damaging your walls, giving you flexibility and peace of mind in your setup.
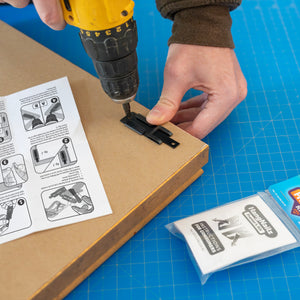
Framers Installation Step by Step
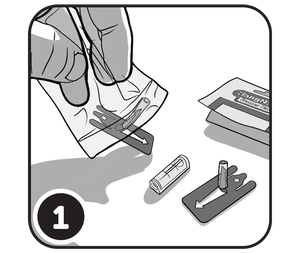
Whats Included
The contents of the framer-
side pouch include:
• 2 anchoring sleeves
• 2 anchoring shims
• M3 screws
Installation requires an M3 Phillips #1 screw-driver
or M3 driver tip for use
in a power drill.
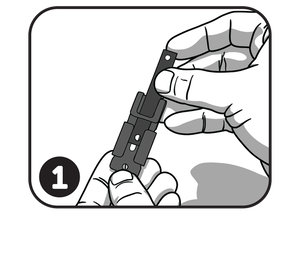
Step 1
Insert the plastics shims
into the sleeves andalign them with the top and
bottom holes.

Step 2
Align the top of the right sleeve with the inside top corner of the frame (fi g. 1).
If using a frame that is less than 3/4-in wide, the sleeve can be positioned to extend over the inside edge of the frame (fig. 2).
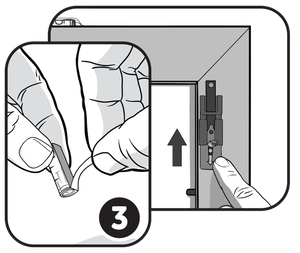
Step 3
If you intend to install the anchor and level for your client, remove the contents of the second pouch. Remove adhesive tape from the level, and place it on the top of the frame. Place a piece of tape over the level to secure it, then slide the anchors into their sleeves.
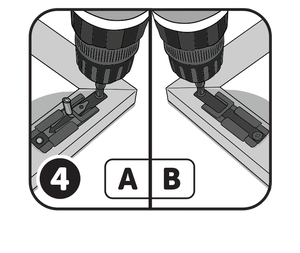
Step 4
Screw the sleeves into the back of the frame. If you pre-installed the anchors (A), please make sure the prong sheaths are securely placed over the V·Barbs.
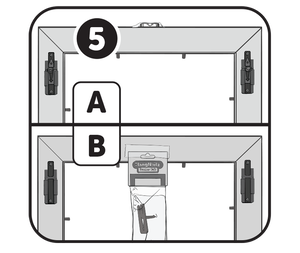
Step 5
If you pre-installed the anchors (A), installation is complete. If not (B), affix the remaining consumer portion of the HangNailz™ Framer’s Kit to the back of the frame for your customer to complete.

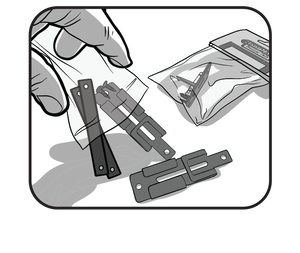
Customer Installation Step by Step
Step 1
Remove the contents of the bag,
which include a quantity of:
• (2) HangNailz anchors
• (1) Adhesive-backed bubble level
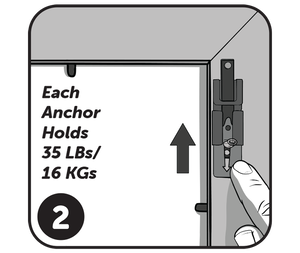
Step 2
Remove the bottom screw from the
right sleeve attached to the back of your
frame, then slide the sheathed anchor
into the slot (arrow pointing down).
Replace screw. Repeat on the left sleeve.
Step 3
Remove the bubble level’s adhesive tape backing and affix it to the top of the frame.

Step 4
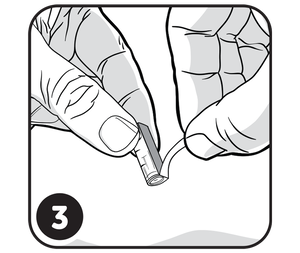
Remove the protective sheaths from
the V·Barb™ prongs.
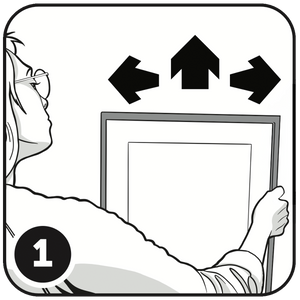
Step 5
Identify the desired height, placement, and position of the frame on the wall (measure, if placement is critical). Using a pencil, mark where one of the prongs will be pressed into the wall.
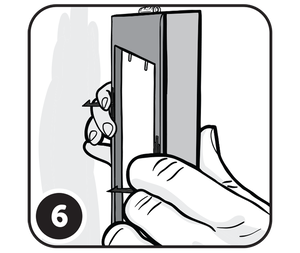
Step 6
Holding the frame, support the prongs (barbs up) with your index and middle fingers.

Step 7
Place the V·Barb (in your right hand)
on your mark. Press the prong until the
head of the barb is inserted into the
wall. Level your frame, then press
the second V·Barb head into the wall.
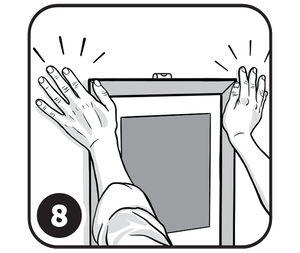
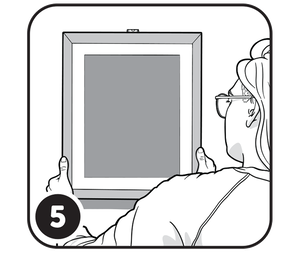
Step 8
Apply even, straightforward pressure to either side of the frame. Slowly and steadily push the frame straight into the wall until it is flush. Do not allow the frame to become angled, and do not push at an angle to prevent bending the prongs. Once against the wall, further level the frame if necessary, then remove the level from the top of frame.
Stick'ums Step-By-Step Removal & Touch-up
Step 1
To remove the frame, lift slightly while pulling away from wall until itfinds the V·Barb exit point, then pull firmly away from the wall.

Step 2
You will notice that a small V-shaped cut remains in the wall.
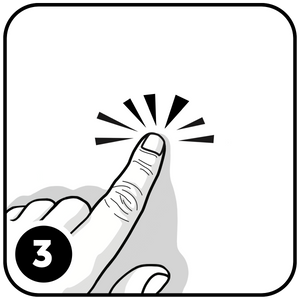
Step 3
Press your finger on the V·Barbexit point to flatten.
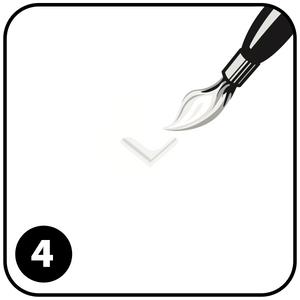
Step 4
Then using a fingertip or a small brush, dab a small amount of matching paint into the exit point.
How To Remove'um